Getting Started With Python On Windows 2021 Edition: Push The Easy Button!
Don't Despair! This Is Gonna Be Easy! :)
Over the last few months I've seen a ton of confusion swirling around social media about how to help people who are new to Python development and software development in general get up and running on Windows quickly.
GOOD NEWS! You can ignore all that. Many of these suggestions are well meaning but come from people who don't actually do Python development on Windows regularly.
Note that I'm not going to tell you the 5 different ways to do a thing, I'm going to tell you the ONE easy way :)
So let's get started!
Side Note: Everyone Will Tell You To Use WSL - You Probably Don't Want That!
I hear a lot of incredibly talented and experienced well meaning UNIX/Mac enthusiasts tell newcomers looking to get going on Windows "Oh well you just use WSL! It's easy! Then you install python with apt get yada yada, and then you install pyenv, and then you configure your shell's environment to use the right shims... and..."
The truth is that if you want to learn Linux - you SHOULD! It's an incredible platform and a virtually bottomless font of power waiting for you to tap.
But if there's one thing I've learned in 30 years in the tech trenches, it's that trying to learn a million things all at once is the surest way to learn nothing. Why not focus on teaching yourself Python programming first and then exploring Linux as a separate effort?
Install Python
If you're on Windows 11 (And I recommend it if your hardware is new enough!) this is as simple as bringing up a Powershell in your swank Windows Terminal. If you want a look at my setup please go read my article on that.
Anyway, all you have to do is type:
winget install python
That's it! This will install the latest stable version of Python from The official Python website. If you're not lucky enough to be running Windows 11, just download the latest stable version from the website's Downloads page and double click on the executable file in your Downloads folder. If you're not sure just keep clicking Next on the dialogs and in a few minutes you'll have Python installed!
Embracing The Power of Py! (Psst. This Is The Easy Button!)
The 'py' Python launcher used to be a super power that only Windows versions of Python shipped with, but now thanks to Brett Cannon, an amazingly prolific Python core developer's hard work our UNIX friends can enjoy the easy button as well!
So let's get this party started and see how easy it is these days to get into the Python prompt:
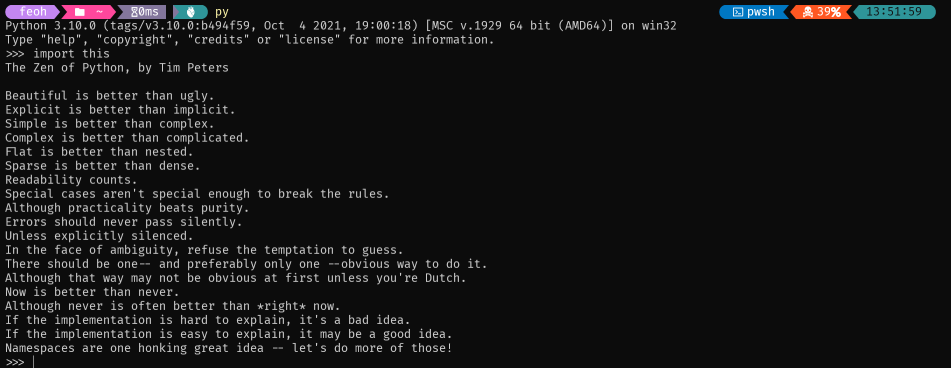
Pretty easy, right?
Note that py has other superpowers as well. It can list all the python versions you have installed, and also let you choose which version to run with the arguments you choose. Run:
py --help
to see an exhaustive description of all the magic tricks py can do :)
Set The Stage
Again, from your Powershell, create a project directory for yourself. Programmers often create a 'src' directory wherever it's convenient (Maybe in your home directory?) and then put their projects underneath.
So let's go ahead and do that:
CD $HOME
mkdir src\starwars_characters

# Yes i'm a big nerd. Our project will pull down a list of characters in the movies from the Star Wars API :)

cd src\starwars_characters
Building A Sandbox
Now let's create a safe space for our project so we don't unintentionally install libraries or other experiments in public. This can lead to situations where you go to create another project but a library you installed previously either causes undesirable behavior or perhaps is even in a broken state, getting in the way of you getting your work done.
We're going to create a thing called 'virtual environment'. Don't worry too much about the details, just think about this as a nice tidy sandbox for us to play in where we don't have to worry about breaking anything outside.
Again from our Powershell prompt:
# Actually create our virtual environment. Put the bits in a folder called 'venv'.
# Most Pythonistas use this folder name, but you can use any name you want :)
py -m venv venv

# Actually activate our new virtual environment in our Powershell
.\venv\Scripts\Activate.ps1
Let's see what happens when we do that (Assuming you're running Oh My Posh, and you should be if you followed my setup article):

See what happens there? We create the virtual environment, and our shell notices which Python version it uses, and tells us that in our Powershell prompt!
Then, we activate our virtual environment, and now our prompt adds a (venv) at the beginning. With this visual indicator in plce, we know we're safely ensconced in our sandbox and can start playing with no worries!
Install Necessary Libraries
You'll need an editor or an IDE. I use Visual Studio Code. It's free, it runs on any modern computer, and it offers an incredibly rich set of tools to help you with your development. Bonus points? It's also free, and even largely open source.
Let's get started, and tell Python which libraries we'll need for our project:
code requirements.txt
In this file, add a single line:
requests
If you want to add a truly superlative interactive Python environment with which to prototype and explore, you could also add IPython:
IPython
(Note IPython here is case sensitive so be careful!)
Now, still in our Powershell prompt, type this command to actually install these required libraries into our virtual environment:
py -m pip install -r requirements.txt
You should see some messages about libraries being installed. Note that you invoke IPython this exact same way:
py -m IPython
Write The Code
Create a file in your project directory called starwars_characters.py with your editor that includes the following code:
import requests

STARWARS_API_URL_BASE = "https://swapi.dev/api"
GET_CHARACTERS_URL = f"{STARWARS_API_URL_BASE}/people"

response = requests.get(GET_CHARACTERS_URL)

response_json = response.json()

characters = response_json['results']

for character in characters:
    print(f"Character Name: {character['name']}")
Here's what my Visual Studio Code session looks like with this code loaded and the output shown in the run window:
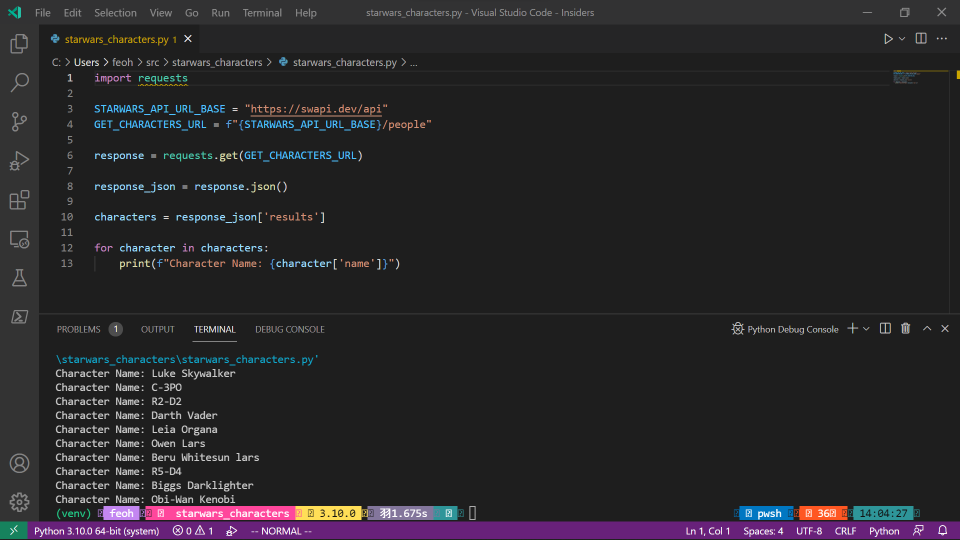
Notice that bit at the bottom that says 3.10? That shows us that Visual Studio Code automatically detected the Python we have installed in our virtualenv. You can click on that to see a list of installed Python interpreters to choose from.
We can run our new project either by using the Run menu inside Visual Studio Code or on the command line with that very same py syntax we used before:
py starwars_characters.py
The End Is Just The Beginning
Well there we have it! You have Python installed and running, and you've built a small but interesting Python project right here on your Windows machine!
The truth is, a large number of people have put in innumerable hours making Python drive smooth like a Cadillac on Windows, so if you find yourself using and enjoying it, the next time someone tells you to abandon all hope and install Linux/WSL, be sure to point them at this article! Maybe if we change some minds we can help bring more Pythonistas into the incredibly awesome Python community!
Please feel free to leave comments with any questions, or hit me up on Mastodon or Twitter.
I'd love to hear from you!